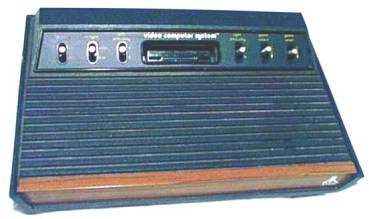
What
to look for when buying a Used or third party Reconditioned Atari 2600 / 2600A /
2600Jr console, A Best Atari Tech Tip.
(Get the printed Best Rev. 10 all Atari Catalog for more than 55+ other helpful Best Atari Tech tips)
If
you have been searching eBay / Auction sites, Swap Meets, Garage Sales, and Flea
Markets looking for a used Atari 2600 Console, the following Best Tech Tips are
helpful in finding a Working / Good 2600 Console, based on 18+ years in the
Atari Business, Reconditioning and Repairing Thousands and Thousands of Atari
2600 / 2600 / 2600Jr Consoles back up to Atari Factory Spec’s and answering
thousands of questions from Atari 2600 owners and former owners who are looking
for another 2600 console.
Well
it is kind of hard to use the following Visual Atari Tech Tips when buying Atari
Consoles on line (eBay / Auction sites)(it is another matter if you have it in
your hand) but at least when you receive / find your Atari 2600 system, you can
give it a quick check, using the following Best 2600 Tech Tips to see if you
got a Real Bargain in “Perfect
Working Order” as listed or something that is going to need some work on
or replacement Atari 2600 parts for it to reliably run.
The
Following Atari Tests and Points to check are Real
World Simple Tests you can do on an Atari 2600 /2600A / 2600Jr
Console without have the Atari Field Service Diagnostic Hardware (Atari MA017600
2600 /2600A /2600Jr Diagnostic Cartridge and the Atari MA017602 Test plugs).
With the
Atari 2600 / 2600A / 2600JR in hand check the following:
1.
Check
the Black RF cord that comes from under the Atari 2600 / 2600A console to the TV
Switch box for any Cuts,
Breaks, Crushed sections or bad sharp bends in the outer black wire
jacket, especially on the ends of the cable (Male Plug) or where it goes into
the 2600 Console. One of the most
common problems is a break in this outer black housing exposing the Copper RF
shield Braid around the male plug. If
this copper braid is broken (sometimes under the black housing without being
exposed, from over flexing) when you connect up your Atari 2600 System to your
TV you get a Poor fuzzy picture or a picture with a lot of RF interference on
the TV display. You can also check
for breaks under the Black RF cable housing by slightly flexing the RF cable
when the 2600 Console is running / connected to your TV.
If the 2600 Display on the TV goes from perfectly clear display to Fuzzy
when you flex the RF cable between the Atari 2600 Console and TV
switch box it is time to replace the 2600 / 2600A RF cable.
The same Tests can be run on the Separate Detachable RF cable that comes
with the Atari 2600Jr.
2.
The Atari Original
Equipment Manufacture (OEM) TV Switch box (the little box that attaches to
your TV) that came with the Atari 2600 / 2600A / 2600Jr consoles was set up to
go to the Twin Screw VHF input on older color and black white TV’s (US / NTSC
TV’s). If your 2600 Console did
come with above Old Style Atari TV Switch box, you are going to need some
adapters to connect it up to the Newer Cable (single Coax input) ready Color
TV’s
or the Atari
Upgraded Universal Cable Ready TV switch box.
If it did not come with a TV switch box, order an Atari Cable Ready
Universal TV switch box at the end of this article. All
of the Atari 2600 consoles ever made, REQUIRE the Mechanical type of TV Switch
box (the one with the little slide lever on top, Computer – TV or
Game - TV) and will NOT properly work with any of the Auto Switching (no slide Switch on
top) TV Switch boxes supplied with the Newer Game Systems.
If you do have an Auto switching TV Switch box connected to your TV
already, just add the Atari 2600 Mechanical TV Switch box in series before or
after the Auto Switching TV switch box. Using
an old used TV Switch box on your Atari 2600 console and you get a poor or fuzzy
display on your TV, check the connections between the TV switch box and Twin
lead flat wire and the Coax adapter. We
have seen Used Atari TV switch boxes where the Copper wire(s) under the twin
lead black plastic wire housing/covering, have broken (because of over flexing
of this cable) right next to the “U” shaped metal contacts (X 2).
The connections looks good on the outside (the outer black wire covering
is intact), but when you flex the TV switch twin lead wire connections, the
display on the TV goes from Clear to Fuzzy.
3. All Atari 2600 / 2600A Consoles Atari made over the
years have a little round black foam dust cover over each slide switch on the
inside of the console (none on the 2600Jr model).
If you look thru the 2600 front bezel around each Sliver Slide Switch (6
on the 2600 and 4 on the 2600A model) and Do
Not see this black foam dust cover (if you see silver metal), then somebody
has been on the inside of the 2600 console and consider this a Red
Flag that the 2600 Console is NOT Stock as shipped from the Factory
and something maybe wrong or bad with the 2600 Console!!
4.
Also look at the condition of the Atari 2600 /
2600A Silver Slide Switches. In
about 95% of the cases over the last 15 to 20 years, the levers should be made
out of a brushed Aluminum material. In
the Best case they should be Bright and Shinny, at
worst case they will be Dark / Black or Corroded White!
Avoid the used Atari 2600 Consoles with Black and Corroded slide
switches. Usually this indicates
the 2600 Console has had VERY heavy use over the years!
See #5 for a 2600 Slide Switch test.
5.
The Atari Slide Switches on the 2600 / 2600A
consoles do Wear out (the
most common are the On/Off and Reset Switches)(on / off on the 2600Jr
model). Try the following tests to
check the condition of your 2600 console Slide Switches.
With the 2600 / 2600A On/Off Slide Switch in the On / Top position,
slightly move the top of switch slightly Left and Right.
If the 2600 game cartridge Display on your TV Glitches, Resets or Turns
off the display, it is a bad switch and it is time to replace this On/Off
switch. On the 2600 / 2600A Monetary Slide Switches (Select and
Reset) Move the brushed metal lever up and down.
The Level should move smoothly up and down with No binding or sticking.
When you are moving the Monetary Switches,
if you see excess Static Interference on the
TV Screen with a 2600 game cartridge running or no action on the 2600 Game
cartridge functions (for left or right player or starting the 2600 game), it is
time to replace/solder in some replacement Atari Monetary switches.
On the Atari 2600 / 2600A consoles, the Color slide switch is very easy
to test to see if it is properly operating on a Color TV.
To test for proper operation of the original Atari 2600 model Left and
Right Difficulty player options slide Switches, insert an Atari 2600 Space Invaders, Breakout
or Super Breakout Atari Game Cartridge. Select a 2 player game.
Then start the game, and notice the size of the Cannon (Space Invaders)
or Cursor size on the bottom of the screen.
When you move the left or right Difficulty switches Up and Down, the size
of the Cannon or Cursor should get larger or smaller as you move the slide
switch. If you see no change at all
on both version games (for left or right player), then the slide switches are
bad. You will have to do this test
for each different 1st and 2nd player versions of the 2600
game to properly test both the Left and Right Difficulty switches.
The same Difficulty switch Tests can be run on the Atari 2600A model
(back side of the Console angled part of the cases) and Atari 2600Jr (back side
of the console) black slide Difficulty switches.
These 2600A / 2600Jr Difficulty and Channel 2 / 3 TV channel selector
switches are many times
missing or damaged on used
2600A / 2600Jr Consoles. On the
Original Atari 2600 model, you may or may not have a channel 2 / 3 selector
switch on the under side of the console.
6. Atari
2600 / 2600A /2600Jr Video/Color Test.
Insert an Atari 2600 Space Invaders, Missile Command, Pac Man or Casino
Game Cartridge into your 2600 and turn it on.
If your Atari 2600 console video is set to factory 2600 video standards,
when you start the Atari 2600 Game Cartridge, you should see a green color on
the bottom of the Space Invaders Screen, Orange
on the bottom of the Missile Command Screen, off Green bottom Strip on Pac Man
Screen, or full screen bright Green on the Casino screen (based on US/NTSC 2600
Game cartridges, colors may vary Slightly on International 2600 Atari Game
cartridge versions). Another
quick 2600 video test, is to turn on your Atari 2600 with a Game
cartridge installed. After
about 3 to 5 minutes of no use / play on the Atari 2600 consoles, it should go
into What’s called “Video
Attack” Mode. You
should see the Color TV display keep changing colors every so many seconds.
This was designed into the Atari 2600 consoles to prevent them from
burning a permanent Image (like you see on some well used / old ATM cash machine
screens) on your TV Screen, if left on for Hours / Days.
This Video test can also used to test (burn in / Heat up) the Atari 2600
chip sets and motherboard inside. We
have seen many Atari 2600 consoles go bad (Glitch, Reset or Turns off the 2600
display) when the internal Atari 2600 Chip set or motherboard heats up from use
or the above easy test.
7.
One of the most common failures on the Atari 2600 / 2600A / 2600Jr consoles is the
rear Right Angle Power Jack on the inside of the 2600 Console.
There is a simple test for this. Insert
your Male 2600 plug of your Atari OEM 2600 Power Supply into your Atari 2600
Console and the wall adapter in the Power outlet.
With a Game cartridge inserted and running, wiggle the Male plug slightly
back and forth and up and down. If
the Atari 2600 console Glitches, Resets or Turns off the 2600 display, the
internal Power Jack it bad. Please
note this same symptom can also be caused by a Bad Atari 2600 Power supply wire
too. Check where the wires going
into the male plug, to see if there are broken or exposed copper wires.
Sometimes the Power cord wires will break under the plastic wire covering
or right next to where the wires go into the 2600 wall adapter and the only way
to test for this is to wiggle the wire connections while the 2600 is running.
Another
high failure rates on the Atari 2600 Consoles are the Wall adapters!
This is usually caused by not
removing the Wall adapter from the Power Outlet when you are finished
playing. You may turn off the 2600
console, but the Atari 2600 Wall adapter is still running (sometimes for years)
if it is plugged in.
8.
Another very simple test on the Atari 2600 /2600A
/2600Jr consoles, is to check the DB-9 Male Joystick ports. Looking at both of the 2600 Consoles DB-9 connectors, you
should see two rows of 5 and 4 Male Pins in each connector. Look for bent pins, Missing or broken pins, or pushed in
pins. Just one bad male pin on
these connectors can cause the Atari Joysticks or Paddle controllers to Not
work properly! If you
have a known good Atari Joystick (or a couple of unknown Joysticks, the chances
of having the exact same problem on two unknown Atari Joysticks in a row are
slight), plug it in the left side DB-9 Connector (most,
but not all, Atari 2600 Games use the left DB-9 connector for #1 Player).
Put in an Atari 2600 Joystick game like Missile Command, start the Game
and check to see if you can get the Cursor on the screen to go in 8 different
directions, up, down, left right and at 4 angles.
Next check to make sure the Fire button is properly working.
If you are using an known working Atari Joystick and the DB-9 Connectors
look good, and you still have Joystick direction or Fire button problems, then
the I/O Chip (CO10750 that handles the Joystick / Paddle functions) on the
inside of the 2600 console is bad or going bad.
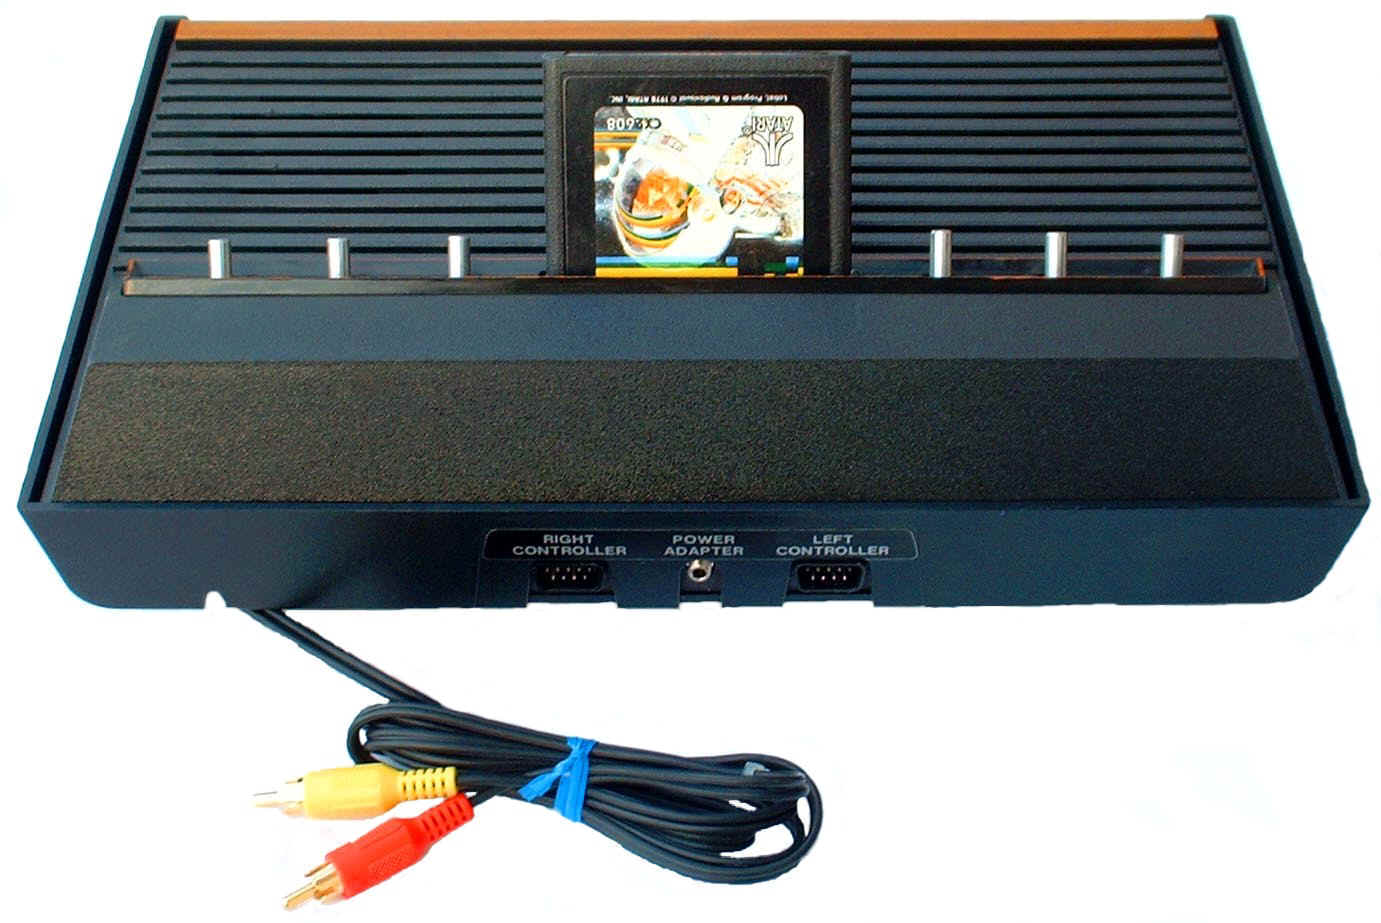
10. Looking
inside the Atari 2600 /2600A /2600Jr Cartridge tiny 1 3/8 inch rectangular slot
opening (the place where the 2600 cartridge PCB board plugs into the 2600
console). You should see two rows
of 12 each gold plated contacts top and bottom.
If you see, Bent,
Greasy,
Corroded,
Green,
one or two contacts out of place or Dirty
contacts, you will have problems with your Atari 2600 Games not
working properly. With your Atari
2600 running with a game cartridge installed, slightly or lightly tap the 2600
Game cartridge on the top side (label side), if you see the 2600 game glitch or
crash the 2600 game, then it is time to either clean or replace the worn out
2600 Game cartridge connector.
11.
Insert any Atari Game Cartridge into your Atari
2600 console and turn it on and start the Game and listen for the normal game
sounds. It is a Very
Common Problem on the older Atari 2600 and 2600A models to completely
loose the sound function (but the 2600 game still displays on the TV fine) or
have a weak sound output of the console.
Bests
Daniel G. of MA. Daniel purchased Bests new Upgraded / Enhanced 2600 Auto Switching power supply and a new Atari PAL 2600 32 in 1 game cart. "I just wanted to express my satisfaction with my order and prompt delivery. Your 2600 Power Supply has eliminated the wavy lines on my screen! I have even done a full recap, 6 new switches (ordered from you last year or so), and voltage regulator previously but it seems like the cheap 3rd party adaptor I was using was the worst culprit! Also despite being a PAL cart the 32-in-1 unexpectedly works fine on new 2600+ on flat screen."
Atari New OEM 1980 / 1990 standard TV Switch box with Atari Coax in and
Coax out adapters. Making it an Atari Cable Ready TV switch box CA010112-C $8.98
Atari German 220V 2600 2 round pin Power supply CA017087
$12.00
Atari 2600 / 2600A / 2600JR Right angle Power Jack FK100308
$1.50
Atari 2600 / 2600A / 2600JR,
Atari 2600 / 2600A On/Off, Color/BW
Slide Switch
CO10373
$20.00
Atari 2600 / 2600A Momentary Reset / Select Switch CO10388
$9.95 each
Eric S. of Germany Eric was having a problem (black screen) with his Atari PAL 2600 console. He contacted Best via E-Mail. A couple of E-Mails back forth, Best recommended Eric get a new set of Atari 2600 plug in PAL chips. "I just received the 3 chips I ordered from you in March. I already put them in my 2600 and what can I say?! It works!!! Thank you very much, for your help and customer service. If I need anything else for my Atari I will order from you. Big thanks again, I hope you are doing fine in those crazy times."
Billy F. of Scotland Billy asked Best "I was wondering if you could help me troubleshoot to see what I would need to buy to fix my Atari. I have a PAL CX2600U 6 switch. I haven't had much luck with most forums and people have been recommending yourself. Any help or recommendation of parts needed would be really helpful." A couple E-Mails back and forth and Billy placed an Atari 2600 PAL chip order with Best. "I would just like to thank you for your help in restoring my Atari back to its former glory. Working again like the day it was born. Your service is second to none. Thanks again for your help. From Scotland"
Atari 2600 / 2600A Round black Foam Dust covers
CO10813
Atari 2600 / 2600A / 2600JR 2,200uF 16 V Japan made Axial Electrolytic Capacitor CO14373 $1.50
Best Atari 2600 Sound Tech Tip. Best is contacted by Atari 2600 owners all of the time saying I read on the Internet that if you have sounds problems with any Atari 2600, you should always replace the 2, 820 PF caps near the orange / red variable sound coil. The 820 PF caps are just one of the reasons why you could have a 2600 sound problems. I purchased some new replacement 820 PF caps from Mouser Electronics, Digikey Electronics, Jameco Electronics or found some on E-Bay. My 2600 sound went from barely could hear 2600 game sounds to nothing at all. Best has found over the years, the Atari 2600 owner simply ordered the wrong version PF caps. Electrolytic, Polarized polystyrene, Dip Tantalum, Mylar film, Monolythic glass / ceramic 820 PF caps will simply not replace the Atari 2600 OEM 820 PF Polystyrene mono caps. These very old Polystyrene type of caps are rarely used on newer designed Electronic devices / motherboards. Hence why the major Electronic parts companies no longer stock them.
Second Atari Sound Tech Tip. Do not adjust the variable Red / Orange sound coil until after you replace the 820 old sound caps with new OEM caps. If you do try to adjust the 2600 sound coil trying to trouble shoot a 2600 sound problem, when you do replace the old 820 PC caps with new OEM ones, there is good chance you will still not hear any 2600 sounds, simply because the variable sound coil is now out of Atari factory sounds coil settings. In most cases once the new OEM 820 PF caps are replaced, there is a very high chance you will not have to make any tuning coil adjustments from the Atari factory setting at all. In very rare cases, you may have to make a minor adjustment to the variable sound coil to get a little sound increase output. Do not use metal hex tools to make any adjustments on the Atari variable sound coils. See information on the Atari plastic hex sound tool below.
Atari OEM 2600 / 2600A / 2600JR 820 pF Poly Sound caps CO10821 $1.00 (Limit 10)
Atari 2600 / 2600A / 2600Jr / 400 / 800 / 7800 / 1200XL / 5200 Red plastic
double sided 2 mm hex sound alignment tool. For use on the Atari
orange / red .6 - 1.2 Mh variable sound coils found on all of the older Atari
motherboards. Using a metal US standard / dimension Hex tool to align
an Atari sound coil, will not proper work, because of the hex metal tool
itself effects electrical properties of the inner power metal ferrite material
properties of the inner movable plug / slug properties. Making it almost
impossible to do a proper sound coil adjustment. As many many Atari techs
have found over the years, there is also very high chance you will also
damage / destroy / cause the movable inner soft ferrite inner core to fall
apart if you use a US standard / dimension standard metal hex tool. A
must have Atari Tech tool when replacing bad Atari 820 pF sound caps
on the above Atari product models / motherboards. FC100142 $6.00
Atari 2600 / 2600A / 2600Jr 7805 Voltage Regulator CO14348 $1.50
Atari 2600 Tech tip: Some early version Atari 2600 6 switch models (and some 2600A models) used a 78M05 1/2 amp Voltage Regulator. The 7805 Voltage Regulator is a beefier 1 amp version which is completely interchangeable with the 78M05 1/2 amp version on the Atari 2600 6 switch and 2600A 4 switch models.
Atari 2600 6 Switch 12 pin (Male to Male) ribbon connecting cable. Used to connect the angled 2600 switch board assembly to the 2600 motherboard. CO12776 / CB103143 $15.95
Atari 2600 12 pin female single row ribbon cable socket. CO14778-3 $4.50
Atari 2600 6 Switch PAL Populated Motherboard CB102595 $45.00
Atari 2600 6 Switch Joystick port right angle fish paper protective cover. CO11902 $2.00
Atari 2600 Joystick port Zener Diode / Cap assembly / wrap CA018263 $2.00
Marc G. of MI Marc ordered a new Atari 2600 OEM On / Off switch and Bests Atari Engineering 2600 6 switch Composite Video mod. "I have recently resurrected an old 2600 “Light Sixer,” which now works but has a couple of minor issues,. Just wanted to let you know that my order arrived this afternoon. I’m very pleased that it arrived so quickly, and everything inside looks great. Thanks for including some of the magazine articles and what not, as well. Bonus points for the Atari-labeled packing tape! Loved it."
Atari 2600Jr. Select and Reset Mylar Switch
CB101198 $3.00
Atari 2600Jr Screw set (5) CB102809 $2.50
Atari 2600Jr US Motherboard CB102347 $59.95
Atari 2600Jr Right Angle female RF RCA jack CB101362 $1.50
Atari 2600Jr. Top case Rainbow Silver label CB102263 $9.95
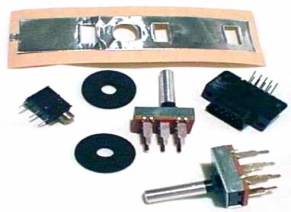
Atari 2600A Upgrade Switch Static Foil
Strips CO17294
Rick of Canada Rick contacted Best via E-Mail. He was having some problems with his Atari 2600 six switch light console and wanted to order some New replacement Atari 2600 parts from Best. We told Rick to try some Best Atari 2600 trouble shooting tips before he placed an Atari order with us. "In the future I wouldn’t be afraid to order parts from you ... I did as you suggested ... I took the consul apart and found the 3 soldered joints ...They looked fine ... But I moved the jack and noticed a bit of movement in the 3 prongs ... So I did a nice job re soldering them ... Reattached the system to the TV ... Put in a cartridge and turned it on ... And guess what ??? Looks like the system was made yesterday ... YAHOO...My 11 year old grandson is very happy ... He says he would some day like to pass it on to his children ... Imagine an 11 year old today wanting to even bother with that old system ... Hope you have a great day ... You sure made mine ... Rick"
Frank V. of PA. Frank contacted Best looking for some Atari 2600 replacement parts (New DB-9 Joystick ports, New 2600 R/A Power jack and New in the box Atari 2600 US Power supply) for his 2600 console he was working on. He placed his very 1st Atari order with Best. "Received my parts today.....ordered two days ago. OUTSTANDING CUSTOMER SERVICE! Thank You very much! I could not be more pleased."
Atari 2600A Black Cartridge
guide and 24 pin cartridge connector CO15573A $17.95
Atari 2600 6 Switch angled new 24 pin female Cartridge Connector CO10806
Atari 2600 6 Switch angled new 24 pin female Cartridge Connector, solder pull off new defective 2600 motherboard. CO10806SP $19.95
Atari 2600A NTSC/US Populated Motherboard CA015911 $69.95
Lee C. of Canada Lee was having some problems with an Atari 6 switch 2600 console he got off E-bay. Couple of E-Mails latter, Lee placed his 1st Atari 2600 parts order with Best. "I had the chance to change the switches and power adapter I bought from you. Everything worked like a charm. You're a lifesaver, these parts are really hard to find. Thanks alot"
Atari 2600 / 2600A Stock long RF cable CB101871
Atari 2600 / 2600A / 2600JR short 6 ft RF cable FK100310 $8.95 Limit 2
Atari CX22 Trackball rebuild kit, a set of 5 complete CX22 Motherboard I.C. chips plus 2 Optocoupler modules CB103165 $15.00 New Item!
Atari CX22 Trackball Complete rebuild kit, a set of 5 complete CX22 Motherboard I.C. chips plus 2 Optocoupler modules and 5 New CX22 bearings CB103166 $30.00 New Item!
Atari Coax adapters for TV Switch box, 300 Ohm twin lead barrel adapter to female Coax adapter CO19783 $2.50
Atari Twin Lead to Right Angle Male Coax adapter CO18994 $2.50
Paul T. of Australia Paul contacted Best looking for some new replacement parts for an Atari 2600 he was rebuilding. He ordered 4 new Atari 2600 slide switches, a 2600 R/A Power jack and 2600 7805 voltage regulator. "You are a legend. I got the parts this afternoon, couldn’t be happier. Beautifully packed to boot. I’ll have to scour markets for more busted 2600s !!!"
Atari 2600 / 2600A 5 pin RF Modulator CA012174 $9.95
Atari 2600 3 pin RF Modulator Call or E-Mail
Kyle D. of IL Kyle contacted Best because he was having problems with an Atari 2600 console he just picked up. Best give him some Atari 2600 trouble shooting tips. 4 to 5 E-Mails back and forth, it looked like his 2600 console had a bad chip set. So Kyle ordered a 2600 replacement 3 chip set from Best. Kyle installed the Best 2600 chip set. It cured the original 2600 problem and the 2600 worked fine. But a new 2600 problem showed up. Kyle's 2600 had a very good display with good sound, but when the 2600 console was turned off and on again a new video problem appeared. We asked Kyle to do a new channel scan on his flat panel TV with the 2600 running a game. "Scanning after changing to the new chips picked up Channel 2, and it runs beautifully on it! Even got full audio! All problems solved!! Thank you so incredibly much for the hugely substantial amount of assistance and components!!"
Atari NTSC/US “TIA” Custom Chip CO104444D $49.95 Limit 1
Atari PAL/Euro “TIA” Custom Chip CO11903 $20.00
Atari CPU Chip CO10745
$5.00
Atari I/O Chip CO10750 $10.00
Atari US / NTSC 2600 / 2600A / 2600JR Field Service Manual. Sections covered, Theory of Operation, Schematics and Silkscreens
Testing and Troubleshooting, 2600 Diagnostic Flowchart, Symptom Checklist, 2600A Diagnostic Flow Chart, Atari Game Controllers, Atari
2600/2600A Parts lists, Atari Field Service Bulletins 161 pages FD100133 $39.00
Atari PAL N 26000 / 2600A / 2600Jr Field Service Manual, Sections covered, Theory of Operation, Schematics and Silkscreens
Testing and Troubleshooting, 2600 Diagnostic Flowchart, Symptom Checklist, 2600A Diagnostic Flow Chart, Atari Game Controllers, Atari
2600/2600A Parts lists, Atari Field Service Bulletins 138 pages. CB102554 $35.00
Atari NTSC / US 2600 / 2600A
/ 2600Jr Diagnostic Cartridge MA017600
$45.00
Atari PAL / Euro 2600 / 2600A
/ 2600Jr Diagnostic Cartridge CB102363
$45.00
Atari DB-9 Shorts plugs (2) for all above 2600 / 2600A / 2600Jr Diagnostic Cartridges MA017602 $29.95 pr. Limit 1 set total
Atari Insider 2600 Trivia / Information: Atari Engineering official / description was The Atari 2600 Signal Tracing Diagnostic. But some Atari Tech(s) or Atari warehouse person started to call it the Atari 2600 "Kluge" cart. That unofficial name stuck with that Atari item. Best got boxes and boxes of the Atari Signal Tracing cartridges out of the local Sunnyvale Atari warehouses, all were marked Kluge carts.
Atari 2600 / 2600A / 2600JR Signal Tracing Diagnostic Cartridge. Used with Atari 2600 Field Service Manual diagnostic flow charts, Multi meter or Oscilloscope required. No Video display. MA017601 $29.95
Atari Engineering 2600 Heavy and Light Six switch consoles Composite Video modification.
General Information
When Best Electronics helped cleared out all of the Sunnyvale Atari Warehouses over a 10+ year period, one of the additional buildings we bid on and got the rights to remove any Atari Hardware from was the Atari Corp. Main building 1196 Borregas Ave. In this Atari Corp. building was Atari Purchasing, Engineering, Engineering Prototype lab, Sales, Accounting, Marketing, Legal and other Atari departments.
In the Engineering section we came across a single Modified Euro PAL Atari 2600 Light Euro console with a Composite Video mod. installed. It got put into a box and stored onto one of the thousands and thousands of Pallets of Atari goods we put into our San Jose Warehouse over the years. We recently finally broke down one of those Pallets of Atari items from the Atari Corp building and again found that Engineering 2600 console. To us this 2600 Light console looked like an Atari Engineer’s modified 2600 Light console with a Composite Video mod installed project.
Items required for this 2600 Composite Video Modification.
General Soldering: 25 Watt Soldering Iron
RF Modulator Unsoldering: 35 Watt Soldering Iron
Solder
Needle Nose Pliers
Small Flat blade Screwdriver and Phillips Screwdriver
A good Solder Sucker or a lot of Solder Wick
Hot Melt Glue
Small pencil Flash Light
Ohm Meter
Recommend Video Test Cartridges Atari Diagnostic Cartridge or Atari 2600 Game cartridges, Missile Command, Space Invaders, Casino, Black Jack or Combat.
The abilty to follow written installation instructions with pictures
This upgrade is so simple no schematics / prints are supplied but is well documented and has many color photos of the upgrade process. You should be able to solder and unsolder components, read resistor color codes, read Signal Diode part numbers and read the silk screen component # locations (Example: R222 location) on the Atari 2600 Motherboard
Optional: Drill and ¼ inch drill bit.
About 1 to 2 hours installation time.
21 Page set of Installation instructions with 16 color pictures
All Electronic Components required for this 2600 Composite Video Mod.
Set of 6 ft Composite Video and Audio cables with Gold Plated RCA connectors on the other end already modified cable ends for easy installation onto the 2600 motherboard.
Atari Engineering US 2600 Light and Heavy Composite Video Modification Rev. 3 CB103132 $20.00
Caller ID # required on all phone calls to Best
Current Pacific Standard Time is: